The word simple has many meanings, but the ones I have in mind here describe qualities such as clear, clean, uncluttered, not complicated or consisting of only essential things.
Striving for these qualities may well be the most important way to get better photos. Andreas Feininger put it this way: “The simpler and more direct, the clearer and stronger the statement”. The problem is that many of us tend to include as much as possible in the picture, so that the viewer easily gets confused, because there is no clear message. When there are fewer elements competing for attention, your picture will usually be a lot stronger. The first thing you have to do is decide what the main point of interest in the scene is. Then you must find out if there are any competing ones. If this is the case you must determine whether the image would become weaker or stronger by including these. You may be able to do this on the spot, but it often easier to take a couple of different shots and select the best ones later on. If you take pictures of plants in the wild, at least some of them should include a fair bit of the environment too.
One way to get a better, less cluttered picture is often to get closer to the subject. As the famous war photographer Robert Capa used to say: “If your pictures aren’t good enough you aren’t close enough”.
By getting closer you simplify the picture, thereby focusing attention on the main subject and getting rid of distracting objects.
Often the picture can also be simplified by limiting the Depth of Field
This picture gives a good impression of the harsh surroundings this species of Hessea has to cope with , but visually it is not very appealing
The second picture gives much more information about the flowers, while still showing the plant in its environment
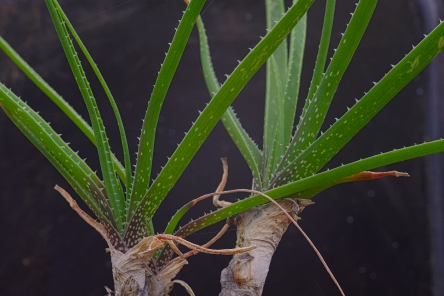
Thefirst of these 3 pictures gives a good impression of what this species of Aloe looks like, but it is a bit jumbled
For the second picture I cleaned up the plant a bit, by removing remains of old leaves. This gives us a better view of the spotted backs of the leaves, which are so typical for this group of plants. By moving in, we have also got a much stronger picture
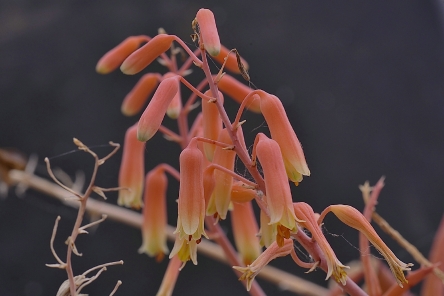
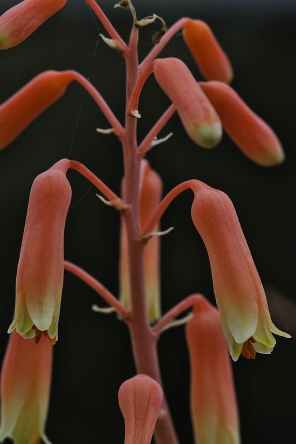
The third image verges on the abstract, but it is still recognizable. Because of that, it is not just visually but also botanically interesting
The individual flowers are quite beautiful, but the pictures does not show them to advantage
By going nearer I managed to get rid of the unnecessary and disturbing elements
When looking at all those beautiful and unusual forms, colours and textures in succulents, it is easy to think that all this is there for our enjoyment. I’m afraid that is not the case; most of it is purely functional. For me, instead of being disappointing, this fact adds to my pleasure and admiration. What can be more likeable than things that are both useful and pleasing to the eye? In this post we will have a look at some of the contraptions that succulents use to conserve water.
The one thing that sets succulents apart from all other plants is their ability to store water that they can use during periods when there is no external supply. Obviously it is not much use to store a lot of water if you do not have the means to conserve it as well. Managing the stored water sparingly, mainly has to do with reducing transpiration.
The rate at which plants lose water by transpiration is influenced by a number of factors: size and form of the plant, temperature, humidity, intensity of sunlight, precipitation, wind speed, land slope etc.
On some days the temperature of the soil surface may rise as high as 75 degrees C, but a few centimetres higher up it will usually be much cooler (up to 40 degrees less ). The two extremes will be separated by a layer of still air.
Comparable layers with gradients of humidity and temperature are found above plant surfaces; they have a great influence on transpiration. These layers are disturbed or even destroyed by wind. Because of this, many succulents have a cover of hairs, spines, etc. on the surfaces of their leaves or stems. This helps in producing and protecting these layers. Such a cover also gives a certain shade and helps to diminish exposure to strong radiation –especially when it is light in colour. It has been found that tissue temperatures below spines of the cholla cactus (Opuntia bigelovii) can be reduced by as much as 11 degrees C.
In this Anacampseros albidiflora, short hairs on the leaves and long bristles between them, cooperate to keep the plant cool
Pelargonium barklyi is a tuberous plant. Although the leaves are short lived, it is apparently worthwhile to protect them with a cover of hairs
Haworthia arachnoidea gets its name from the spiderweb like cover of hairs. This variety is called scabrispina because the hairs are rough and hard like spines
In Senecio scaposus the leaves look like covered in felt
Many people think that spines are only there to protect the plants against browsing animals. In line with what we have discussed here, I think that spines play a certain role in that respect too, but that it is not the only, or even the most important, one.
In cases like Othonna euphorbioides (above) and Euphorbia stellispina -and in many other plants- the spines are actually hardened remains of inflorescences
Leaf and stem surfaces are often thickened too, or coated with a layer of wax (Senecio stapeliiformis, on top) or cork (Othonna herrei)
That’s a bit of a silly question, isn’t it? We take a picture of something because we want to have a picture of it. That’s all there is to it, or is it?
To get a more useful answer, maybe we should make the question less general: Why take a picture of a certain plant?
The answer could still be vague: because I like to have a picture of this plant. As long as that is all you want, fine. As they say: if you don’t mind where you are going, you ain’t lost.
If, on the other hand, you want to make a meaningful picture, your answer will have to be more specific. You must be able to put into words why exactly you would photograph this plant. Otherwise, the best you can expect is what the famous Ansel Adams used to call “a sharp image of a fuzzy concept”.
The reasons for photographing a plant (or a part of a plant!) may cover an enormous range:
- because I like these flowers
- because I’m writing an article on this species
- because this is the first time I see the plant in the wild/ in this kind of environment/ in this area
- because I want to show the peculiar hairs on the leaves
- because I don’t have a picture of this species yet
- because the fruits remind me of …
- because I want to show the plant in its natural surroundings
- because normally the plant does not flower in this time of the year
- because I don’t know the name of the plant and hopefully the picture can help me sort it out
- because the fruits/buds/young leaves look so wonderful
- because I am awed by how this little plant survives in its hostile environment
- because I want to impress people with a picture of this rare plant in my collection
- because the picture will remind me of this wonderful trip
- because……, because……., because…….
Obviously you don’t have to restrict yourself to one reason. Do remember however, that each reason will demand a different approach. You will not be able to show a big plant as a whole and a detail of it, at the same time; if you want to show hairs or warts, you will probably need to use side lighting or backlighting, etc.
When you look at the list a bit closer, you will notice that part of the reasons have to do with the subject as such. In that case you will need a documentary, representative approach. Other reasons have to do with your response to the subject, requiring an impressionistic, creative approach. Being aware of all this and responding in a suitable way, is an important step on the way to better pictures.
Twice the same species (Euphorbia multiceps), but what a difference in pictures!
Huernia pillansii lends itself perfectly for making abstracts pictures
The first picture shows the plant (Drosanthemum bicolor) in its environment, the second one tells us much more about the flowers
The first picture shows the juvenile stage of Mitrophyllum clivorum, the second one gives an impression of an adult plant
As you probably know, photography means drawing (or writing) with light. Simply said: no light, no photography. In this post I’ll describe two important aspects of light:
Quality of lightusually refers to its degree of diffusion, i.e. how harsh or soft it is.
We tend to think that a clear sunny day is ideal for photography. As we will see, in reality it often gives the worst possible lighting, especially for taking plant pictures.
A direct light source, such as the sun in a clear sky, produces harsh, contrasty light . The highlights and shadows are strong , resulting in big contrasts with abrupt transitions. This hard light also tends to make colours weaker.
Our eyes can cope with this kind of light much better than the camera, so that what looks acceptable in the viewfinder often turns out useless once it is photographed.
When the contrasts between light and dark are too big, many details will be lost, either in shadows or in washed-out areas. You may therefore have to use a diffuser to soften harsh sunlight and/or a reflector to get some light in a dark spot. Hold the diffuser as close as possible to the subject. If you hold it further away, it will just throw a shadow on it.
This picture was taken in harsh sunlight and is therefore very contrasty. Even after spending quite a bit of time enhancing it in post-production, this was the best result I could get.
This photo of the same species was made on a bright, overcast day, giving a much more pleasing result, even without any enhancing. Using a diffuser on a sunny day would have yielded a similar result.
In this pair, the differences are rather more subtle. The first picture was made without doing any special; for the second one I used a diffuser. Although I like both of them, the first one reminds me more of the hot and sunny day on which it was made. Therefore it also gives a better idea of the conditions these plants have to cope with.
In many cases the sensible and careful use of flashlight may also help. If none of this works, you will have to decide what is more important to you: preventing the highlights from becoming burnt-out or the dark areas from turning completely black. The first option is usually best.
On bright overcast or misty days the light will be soft and diffused, with shadows evenly scattered around the subject. This kind of light produces soft contrasts and is easy to work with. It is very pleasing for photographing flowers. However, sometimes you may have too much of a good thing and end up with light that is too flat. In such a case, it is a good idea to add some shade to a small portion of the picture or alternatively to highlight another part so that it stands out more.
Reflected light is often soft too. Completely overcast days with heavy, dark clouds are not so good for flowers, but may work well for other parts of plants.
Direction of light refers to the camera position with regard to where the light comes from. There are three primary directions of light: front, side, and back. They all have their own characteristics and exert different influences on the mood of an image. Depending on your subject you should try different kinds of lighting to see what effects you like best.
When the light comes from behind you and falls directly on the front of your subject matter, we talk about front lighting. The entire subject is evenly lit and the shadows mostly fall behind the subject, so that this often appears lacking in volume and texture. In close-up photography this type of light also may cause problems by the lens or lens shade throwing a shadow on the subject.
Back lighting is the opposite: the light comes from behind your subject matter; it emphasises shadows and outlines shapes strongly.
Back lighting can produce striking pictures, especially against a dark background
It creates strong contrasts and can produce a bright outline around the subject. Like side lighting it can make the colours of translucent objects sparkle. It is most effective with translucent or strongly coloured leaves or flowers. It may be necessary to underexpose 1-2 stops in order not to overexpose the bright areas; on the other hand it is sometimes advisable to open up 1-2 stops in order to allow detail in the subject. Therefore this is one of the situations where you should bracket your exposures.
Back lighting is not an easy light to work with, but it tends to create a strong mood and can produce images that are hard to ignore. Both side lighting and back lighting normally occur when the sun is low on the horizon (early in the morning or late in the afternoon). When you can photograph a plant from underneath, you may get the back lighting effect at other times of the day as well.
Side lighting is best for showing texture, as it gives the picture a 3-dimensional quality.
There is a clear separation between the light and the dark side of the picture. The shadows produced by side lighting may or may not be useful in composing your picture. Like back lighting it can make the colours of translucent objects sparkle.
Because the light is coming from the side, we see not only the tiny dewdrops, but also their shadows on the leaf
The great majority of succulents stores water in stems, leaves and/or roots. Some of them however, mainly members of the vygie family (Aizoaceae) also make use of external storage. They have an epidermis covered with extremely enlarged and swollen cells (so called bladder cells) that are able to store water. Amazingly up to over 50 % of the total amount of water stored by the leaves can be located in these cells.
The cells have another advantage too: they are so big, that they create windless spaces above the stomata (breathing pores) so that transpiration is reduced. When a plant start suffering from drought stress, the cells collapse. This obstructs the passage of air to the stomata, so that water loss is reduced even further
One of the best known examples is the genus Drosanthemum (“dew flower”)
In this species (Mesembryanthemum guerichianum), the bladder cells are especially big on the calyx
Phyllobolus nitidus is named for its shining appearance (nitidus = glossy, polished or shining)
A couple of months ago my wife and I were travelling to our farm near Matjiesfontein when we decided to have a short coffee break. As usual, I utilized this opportunity to quickly scan the area. Not far from the road I came across a plant of Cotyledon orbiculata (the beautiful form that used to be called undulata).
This picture shows my first attempt of photographing the plant.
It is not a bad photo, but neither does it convey the feeling I got when looking at the subject.
After cropping the picture this is what I got. Much better I thought, but too realistic.
Cropping in a slightly different way, combined with darkening the picture and enhancing the colours, resulted in this.
It seemed to me I was on the right track, but now the left side of the photo was too busy and distracting.
I had also made another picture, almost identical to the first one, but taken from a slightly different angle. When I closely compared the two, it became clear that the second one would be the best starting point for the picture I wanted.
I first treated the picture the same way as in number 3 and the lowered the contrast.
This is the end result, realistic enough to be of botanical value, but at the same time visually stimulating.
The editor of “Veld & Flora” ( http://www.botanicalsociety.org.za/) invited me to write an article on succulents for the magazine. It is now ready and will be published in the March issue.
The article is called “Miniature succulents – masters of survival” and highlights some of the intriguing adaptations miniature succulents deploy in order to survive. The following snippet will give you some idea of what to expect.
A peculiar adaptation is shown by many members of the mesemb family (Aizoaceae), especially the dwarf ones, which are able to recycle water from old leaves to new ones.
As the soil dries out towards the end of the growing period, the older leaves are gradually sacrificed and their water content is translocated to and stored in the younger ones. In this way, all available water reserves are concentrated in the last pair of leaves.
In the end, the dry remnants of the old leaves form a papery sheath acting as a protective layer of insulation for the new ones. When the next rainy period starts, the new pair reaches its final size and bursts through the old skin, ready for action.
It has been found that this adaptation enables plants to survive for about a year without any moisture supply from outside.
These three pictures of Antimima pygmaea were taken near Matjiesfontein in winter (mid August), spring (early October) and summer (end of January) respectively. At first, it would be hard to believe that it is all one species.
When one looks at the many plant pictures that can be found on the internet, it quickly becomes clear that there is a lot of room for improvement.
The two most common problems by far are:
-clutter (too many competing elements in the picture). The photographer seems to be saying: “Look, there is so much of interest here that I cannot choose. Please help yourself”
— a disturbing background (too dark or too light, too much in focus, wrong colour etc.)
Once you have become aware of these 2 problems you can take your first steps to better plant pictures.
Other problems one often sees, such as too much or too little contrast, may sometimes be (partly) remedied in post production. For the two main problems, that often is not possible unfortunately.
Modern cameras can take most decisions on their own. In itself that is a wonderful thing, but we have now reached a stage where it may become counterproductive. In other words, the photographer is lured into thinking that he/she only has to point the camera at the subject and press the button to get a nice picture.
When you decide that maybe your pictures are not as good as you would like them to be, you have to take back some of the decision making into your own hands.
Once you have found a suitable subject, it is a good idea to first take a picture of the plant as a whole. After this you should try to describe to yourself what the subject is and what is so interesting about it. Then include in the picture only what fits this description. Doing all this will force you to slow down and that may sound like a bad thing. The opposite is true however, as a lot of less-than-perfect pictures come about because the photographer is in a hurry.
Both the pink blotches at the bottom and the bright spot on the right draw attention away from the subject.
Simply by changing the camera position slightly, I was able to get this result. Well worth the extra bit of trouble, don;t you agree?
Each time you make a picture you make decisions even if one is not aware of it.
Mentally working through a check-list will make this decision making process easier. In the beginning it will seem like overkill and it may make you feel a bit silly (especially when others are around). But so what? Following these simple steps is bound to result in better pictures and that is what it is all about, isn’t it?
Your check-list could be something like this:
*Is the subject matter at hand the best I can find, or is there something better nearby?
*Will one picture be enough or do I need more to tell the story, maybe one of the whole plant in its environment and some of details?
*Is this a good time of the day/year to take the picture? Should I try to return later, when the flowers are open, the fruits are ripe, the leaves have unfolded etc.?
*Is the light all right or should I rather wait a while or come back later?
*Should the background be in focus, so that it adds information to the picture or out of focus so that the subject stands out more? Are there any unwanted objects/shadows/ highlights in the background? Do I need a different background or foreground?
*Will moving the camera give better results (forward or backward, tilted, raised or lowered)? What if I step or turn left or right?
*Will a different focal length (if available) or focus point create a better picture?
*What will happen if I change the aperture or the shutter speed?
*Are the contrasts in the picture space not too high? Should I use a diffuser or reflector?
After taking the picture, look at the display at the back of your camera to see how the picture has turned out: is the lighting even; is the exposure correct; is the depth of field enough (and in the right place)?
Of course there is much more to making good plant pictures than this, but it may be a good start.
If you want more information on the subject, have a look at my Ebook “Plant and flower photography”
A short while ago I stumbled upon a website that turned out to be very interesting.
Here is the link: http://www.ispot.org.za,
and here is what they themselves say about the site:
“So what’s it all about?
iSpot is a website aimed at helping anyone identify anything in nature.
Once you’ve registered, you can add an observation to the website and suggest an identification yourself or see if anyone else can identify it for you.
You can also help others by adding an identification to an existing observation, which you may like to do as your knowledge grows. Your reputation on the site will grow as people agree with your identifications.
You may also like to visit our forums which offer lively debate around observations and other more general topics.”
This is the type of picture that many people would take. One can see how the plants grow in their natural environment and how many flowers they produce, what shape and colour the flowers are etc.
This picture tells us that the same species may also grow in a different situation and it shows the leaves and the back of the flowers.
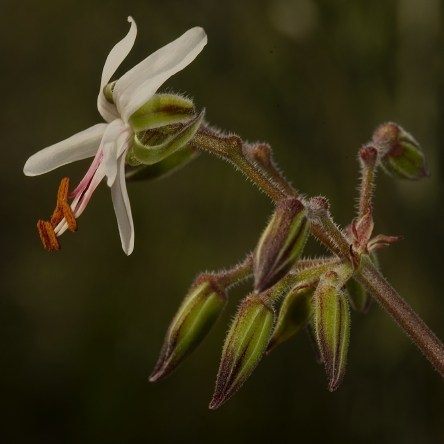
Here we see the relatively enormous size of the flower and the beautiful markings on it.
So between them, these three pictures are quite informative, and with some cropping their message would become even stronger. But whatever you do to them, they will still be run-of-the-mill pictures and visually there is not much to return to once you have seen them. Now look at the next picture!
Here we are still looking at the same species, but the picture is rather different!
This time we see no open flowers, but the back of an almost mature bud. The dark background makes the petals almost sparkle.
This is a small part of my e-book “Plant and flower photography; from theory to practice”. For more information have a look at my website www.noltee.com

